Hello, I'm Chino Yoshio, quietly composing music in Kyotanabe, Kyoto.
Today, I would like to show you how to easily reproduce my "Sine Wave Version" settings using Logic Pro.
Normally, I use Kontakt for this setup.
Sine Wave Version Settings in Kontakt
Prepare a 440Hz Sine Wave and import it into the sampler (Root Key: A3).
Layer 1 (0dB)
Attack: 5ms, Hold: 0ms, Decay: 4000ms, Sustain: 0dB, Release: 400ms
Layer 2 (-15dB)
Attack: 5ms, Hold: 0ms, Decay: 200ms, Sustain: 0dB, Release: 0ms
Quick Guide in Logic Pro
1. Generate a 440Hz Sine Wave via Utility > Test Oscillator.
Set Sine Wave, 440Hz, Level -12dB, choose suitable length.
2. Bounce via File > Bounce > Project or Section.
Choose PCM, 16-bit, 44.1kHz.
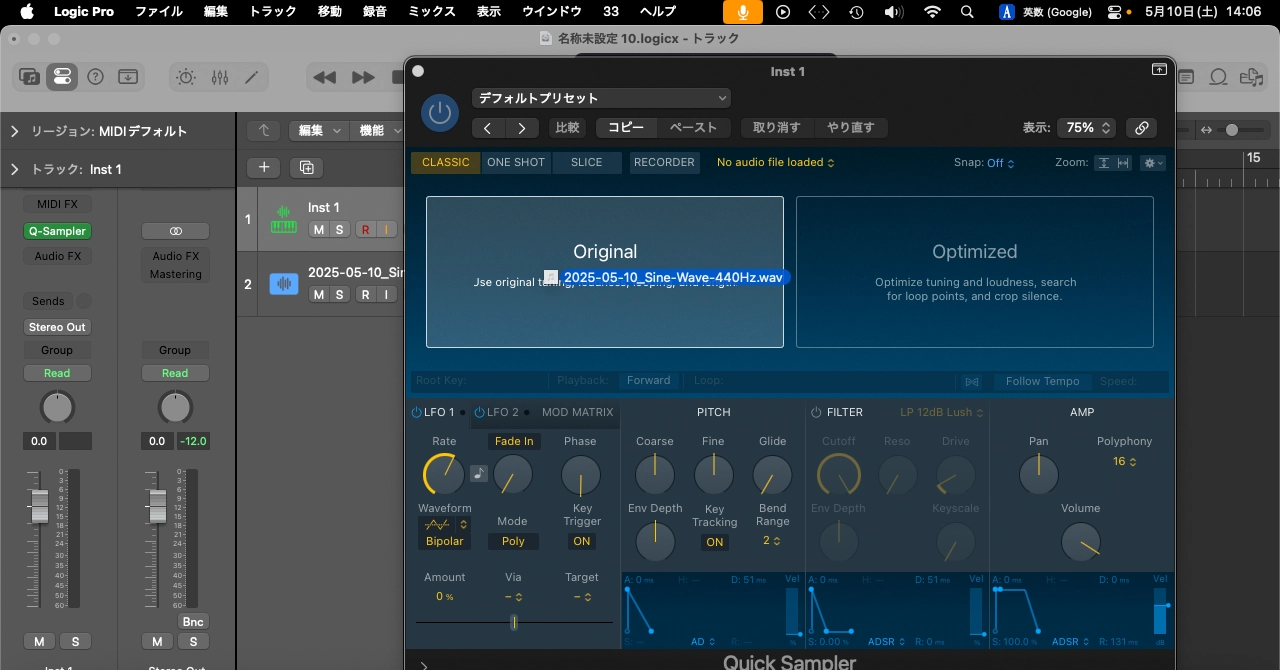
3. Create a new instrument track and open Quick Sampler.
4. Import the bounced sample in Original mode.
5. Configure Layer 1:
Root Key A3, LFO1/LFO2 off, FILTER off, Polyphony 64.
Envelope: Attack 5ms, Decay 4000ms, Sustain 0dB, Release 400ms.
6. Duplicate for Layer 2:
Decay 200ms, Release 0ms.
Set volume lower than Layer 1 (-15dB recommended).
7. Create a Summing Track Stack.
8. Adjust layer balance and filter per song as desired.
I also tweak filter settings depending on each track.
Sine Wave Version Settings and Easy Reproduction in Logic Pro
Sine Wave Version セッティングとLogic Proでの簡単再現
こんにちは、京都・京田辺で静かに作曲活動をしているChino Yoshioです。
今回は、私の「Sine Wave Version」のセッティングをLogic Proで簡単に再現する方法をご紹介します。
普段はKontaktを使用しています。
KontaktでのSine Wave Version セッティング
440Hz Sine Waveを準備し、サンプラーにインポート(ルートキーはA3)。
Layer 1 (0dB)
Attack: 5ms, Hold: 0ms, Decay: 4000ms, Sustain: 0dB, Release: 400ms
Layer 2 (-15dB)
Attack: 5ms, Hold: 0ms, Decay: 200ms, Sustain: 0dB, Release: 0ms
Logic Proでの簡易再現手順
1. Utility > Test Oscillatorで440Hz Sine Waveを生成。
2. ファイル > バウンス > プロジェクトまたはセクションからPCM 16bit / 44.1kHzで書き出し。
3. 新規インストゥルメントトラックでQuick Samplerを起動。
4. バウンスした音源をOriginalモードで読み込み。
5. Layer 1設定:Root Key A3、LFO1/LFO2/FILTERオフ、Polyphony 64。
Envelope:Attack 5ms、Decay 4000ms、Sustain 0dB、Release 400ms。
6. 設定を複製しLayer 2作成。Decay 200ms、Release 0ms。
音量はLayer 1より低め(-15dB目安)。
7. サミングスタックを作成。
8. レイヤーの音量バランスやフィルターを曲ごとに調整してください。
私も楽曲ごとにフィルター設定を変更しています。
今回は、私の「Sine Wave Version」のセッティングをLogic Proで簡単に再現する方法をご紹介します。
普段はKontaktを使用しています。
KontaktでのSine Wave Version セッティング
440Hz Sine Waveを準備し、サンプラーにインポート(ルートキーはA3)。
Layer 1 (0dB)
Attack: 5ms, Hold: 0ms, Decay: 4000ms, Sustain: 0dB, Release: 400ms
Layer 2 (-15dB)
Attack: 5ms, Hold: 0ms, Decay: 200ms, Sustain: 0dB, Release: 0ms
Logic Proでの簡易再現手順
1. Utility > Test Oscillatorで440Hz Sine Waveを生成。
2. ファイル > バウンス > プロジェクトまたはセクションからPCM 16bit / 44.1kHzで書き出し。
3. 新規インストゥルメントトラックでQuick Samplerを起動。
4. バウンスした音源をOriginalモードで読み込み。
5. Layer 1設定:Root Key A3、LFO1/LFO2/FILTERオフ、Polyphony 64。
Envelope:Attack 5ms、Decay 4000ms、Sustain 0dB、Release 400ms。
6. 設定を複製しLayer 2作成。Decay 200ms、Release 0ms。
音量はLayer 1より低め(-15dB目安)。
7. サミングスタックを作成。
8. レイヤーの音量バランスやフィルターを曲ごとに調整してください。
私も楽曲ごとにフィルター設定を変更しています。